Trailer Wheel Bearings
What causes accelerated wear-out of trailers wheel bearings, how to check them, diagnose and replace…
A wheel bearing is a mechanical element designed to minimize the friction between rotating parts.
The most common in automotive industry are ball and roller bearings designed for axial rotation and radial load.
They suppress (or rather minimize) the friction between the spindle (shaft) on which sits the wheel (in this case bearing’s inner ring called “front race”) and the wheel (in this case an outer bearing’s ring called “outer race”) by cushioning the contact between them.
Some bearings like for example these installed in car’s front wheels must also support axial forces applied to wheels when the car is making a turn (especially at the high speeds when dynamic axial and radial forces may be quite high).
To guarantee their durability, these bearings have quite complicated structure and usually require professional service if replacement is needed. Trailers and in general towable vehicles are less-demanding in this sense what allows for use of lower cost bearings. This also offers a room to “handy” owners for diy service and/or replacement.
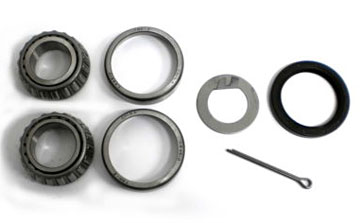
Trailer wheel bearings kit
In the past, bearings required frequent lubrication. These days most bearings are sealed for life, at least in more expensive vehicles and travel trailers. Lower cost trailers (like boat trailers, utility trailers but also low end travel trailers..) will still have non-sealed, re-packable bearings that from time to time may need a cleaning and an “extra shot of grease” .
While theoretically they are protected from the external dust and leak of grease by dust caps, they are not sealed so eventually after thousands of miles they will accumulate the dust (and little particles of metal due to bearings’ wearing process) as well as will experience the gradual loss of grease.
In most cases bearings can be removed, cleaned, re-greased and reinstalled in the hub. However if they are worn-out the best and only option is to replace them to prevent major problems (usually at most inconvenient moment).
If you do not know exactly the part number for your bearings, you may have to first remove the old ones from the hub and read the number stamped on the rubber part of the seal or simply take them to the shop.
What contributes to bearings damage?
Thanks to the huge technological progress wheels’ bearings are manufactured for “lifetime” use. In fact in most circumstances they outlive in relatively good shape their “hosts” – cars and trailers. Practically they do not need any particular maintenance or periodical greasing as it was required in the past. They do have however some “enemies” that careful driver should be aware of and these are:
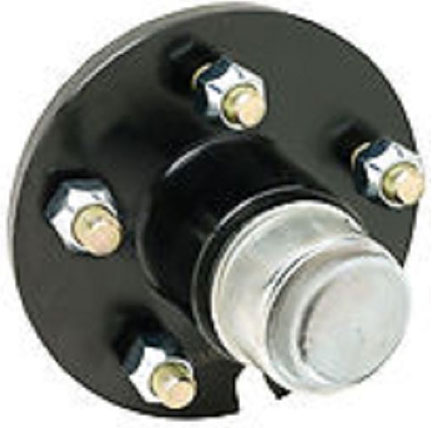
Boat Trailer wheel hub kit
a) Unbalanced wheels
Unevenly distributed mass along the wheel generates dynamic overload on the wheel assembly. It is proportional to the radial speed of the wheel (in other words speed of the car and trailer) and can easily exceed the limits. Typically it may be caused by loss of balancing weight(s) or by mechanical damage to the rim.
b) Off-road (or bumpy roads) driving conditions.
Although none of us likes “shaking” experience of driving on bumpy roads, in most cases we do not have a choice. The only thing we can do is to be aware of its damaging effects and periodically check suspension’s integrity (tires, rims, bearings, shock absorbers….).
c) Overload
Trailer’s suspension (that includes tires and bearings) is designed for specified maximum load. Exceeding the maximum load (that can also happen when trailer’s load is distributed unevenly) may lead to increased wear and eventually damage of bearings (and tires).
Fortunately, quite often some visual changes can be seen on tire’s treads. In other words any irregular or asymmetrical wear seen on the tread is the red flag that should prompt driver to check the whole wheel assembly.
There are also other reasons why wheel bearings may fail:
d) Poor installation
Although the probability for that to happen is very low in new cars (manufacturers’ installation), it may happen when the wheel bearings were replaced in the garage or by an owner. In most cases poor installation means that the bearings were tightened too much or not enough (left loose) or the bearing’s seal was damaged.
We are not listing here the one more obvious case – car accident!
e) Water penetration
Water contributes to the premature wear-out of bearings. It will cause corrosion which in turn will increase the friction and generate an extra heat. The process once started will continue accelerating the wear-out and eventually destruction.
This effect is especially visible in boat-trailers as they are partially submerged in the water during lunching and re-loading the boat
How to check trailer’s wheel bearings
Noisy wheel bearing indicates that it is time for replacement to avoid serious damage. Unfortunately usually we are the last ones to see the problem. It’s because usually we do not use trailer on a daily basis, and anyhow - it is rather “out of sight” (or actually “out of our hearing zone”) when towed behind. That is why quite often we are taken by surprise when on the road wheel bearing “suddenly” starts to squeak and then quickly fails abruptly ending our trip.
But there is a way to prevent such black scenario by periodically checking the state of the bearings.
Here is how:
- Raise one side of trailer’s axle by using a car jack (prior to that block the opposite side wheel),
- Place the jack stands to secure the vehicle (it’s better to be safe than sorry),
- Grab the wheel (tire) at both ends of its horizontal diagonal and apply push/pull forces in opposite directions at both ends. Repetitively change the direction of applied forces at both ends (in other words try to wiggle,(jiggle) the wheel).
- Repeat the process at wheel’s vertical diagonal (grab the top and bottom of the wheel). In both cases you should not feel any movement. Otherwise, (when you feel it loose) either the wheel is not properly tightened by screws to the hub or the bearing assembly inside the hub is loosened or damaged.
- Turn the wheel into free rotation and listen if there is any “unusual noise”.
In order to run this test you have to release the manual brake (rear wheels) and set gear to the Neutral (N) position (front wheels). Practically, this test is easy to run on rear wheels, front wheels are not that easy to spin!
Shift the gear back to the Park (P) position (automatic transmission) or to the Gear position (manual transmission).
Driving wheels you can actually “actively” tests. In such case you have to raise the whole driving side of the car (front for front-driving) and secure on jacks. You also need a second person’s help to run this test. Here is how: - Remove the wheel (to have access to the hub),
- Let your helper to sit in a car, turn on the engine and “dry-run” the car at about 40 mph.
- Use the “stethoscope” (or something acting similarly like for example a long screwdriver) to “magnify” the noise from the bearings (if any) by carefully touching the hub.
Note: Do Not touch any rotating part of the wheel assembly!
If you past these tests then most likely your bearings (in general the “wheel assembly”) are in good shape.
Wheel bearing noise: What does it sound like?
Bad wheel bearing can generate wide range of sounds depending on the degree of wear and speed. It can start as a little whistle, but in most cases it will be a “metal-grinding” type of noise, low rumbling noise, hum, squeaking….. Its pitch will change with the speed of the car. In more “severe” cases you may also feel vibrations.
You can “test” (localize) the source of the noise by temporarily shifting your gear to the Neutral position when driving at a constant speed down the road. This allows you to “decouple” the engine noise from the noise generated by the wheels. The engine will immediately slow its RPM, so if the noise is persisting without changing the pitch, then most likely it’s coming from the wheels.
Note: You must be very careful during this test, because by shifting the gear to N (Neutral) you partially lose the control of your car. You have still the control of the steering wheel and brakes, but you cannot anymore accelerate if needed! So make sure the road is strait and empty at the time of your test.
Conclusion: Noisy wheel bearing needs replacement and sooner is definitely better!
How to replace the trailer’s wheel bearing
To encourage potential diy owners: let’s make it clear – replacing and greasing trailer’s bearing is not a rocket science. In most cases it can be done without a major effort and need for sophisticated tools. On top of new bearings, cotter pin (if needed) - the hammer, punch, large screwdriver, pliers, set of socket wrenches, cleaning solvent, grease and most likely dust cap pretty much makes the whole list of what you need.
The appropriate torque wrench and wheel bearing replacement tool will be beneficial, but not absolutely necessary.
How to do it:
- Loosen the lug nuts on the trailer’s wheel then subsequently raise that side of the trailer with a car jack and secure the trailer with jack stands. The latter is the must!
Please note that small trailers (for boat or utility) will do better if secured by old wheels, tires etc…) because as being relatively light, they may easily fall from jack stands if lateral force is applied to them. - Unscrew the lug nuts and remove the wheel.
Now the real works starts: - Remove the brake drum (after unscrewing retaining screw(s)),
Note: most trailers have the drum-brakes, only small utility trailers may not have them at all. - Remove the dust cap by taping around it with the flat screwdriver until the cap is loosened and can be taken out. You have to do it carefully to not damage the cap if you do not have the new one.
Now you will have access to the retaining nut.
Note: some nuts are protected by a castle-nut with a cotter pin, some are “self-retaining” so correspondingly: - Straighten the ends of the cotter pin then pull it out with the pliers and/or
- Remove the retaining nut and washer then pull off the hub.
Under normal circumstances the hub should slide out together with bearings. If the hub is stuck, tap the back side of the hub using the mallet to “unfreeze” it.
Complete process from removing the hubs through driving out old races, packing bearings, and refitting.
Sometimes in such situation, often hub will come out, however the outer
ring of the bearing (race) will stay on the spindle. You will have to
brake it loose with the chisel and hammer paying attention to not damage
the surface of the spindle.
At this moment the availability of
the wheel bearing removal and insertion tool will be highly beneficial.
Especially, proper insertion of the new bearing is crucial for its
lasting performance. But if you do not have it, it is not the end of the
world.
- Remove the bearing(s) by taping along the outer rim(s) with the block of wood and hammer.
- Clean the inside of the hub and the spindle then coat them with the new grease.
- Generously push the grease into the new bearing(s) until the cage and rollers are fully filled.
- Insert the bearing(s) into the hub by taping along the rim(s) with the block of wood and hammer,
Note: it may help if prior to the installation, the bearing was kept in freezer (it will “shrink” just a little bit allowing for smooth insertion). - Insert the hub back on the spindle (shaft) then tighten the protecting nut.
If you have the torque wrench then set the specified limit (xxx foot-pounds) and tight the nut
Otherwise proceed with the regular wrench in steps consisting in tightening the nut (castle-nut) followed by untightening it by quarter turn. This should help bearings to seat properly in the hub. At the final step tighten the nut (castle-nut) firmly, than back it off about eighth of a turn. It should also help to align one of the castle-nut’s notches with the hole in the spindle. - Insert the castle-nut and the cotter. It will protect the nut from backing-off and ultimately your wheel from coming off and running free on its own).
- Tap the dust cap back into its place,
- Install the brake drum and the wheel than check for play.
Note: It will be wise to check the wheel assembly after few hundred miles on the road and tighten the castle-nut if necessary.
.
About Us / Privacy Policy / Resources
Go to: Pop-up Travel Trailers and RVs