DIY Camper Awning Installation Instructions
See how you can expand your camper’s comfort area by diy installation of the awning....
Camping with your motor-home is great, but the idea is to spend time in the outdoors, not in your motor-home.
But what do you do when the sun is up high and burning?
You need a smart device that will over shade and comfort in the vicinity of your motorhome.
It is not a rocket science, so actually almost anyone can install the awning in his/her camper.
How? Just by following the steps below:
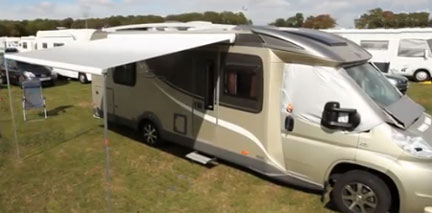
- Measure the length of the surface where the awning will be placed on your motor-home. Start the measurements with a couple of inches ahead of the door and continue measuring with a few inches after the windows in the back of the motorhome. In this way, you will have shade outside and inside too.
- The awning will need three metal brackets for sustaining its weight. Measure and position the brackets at equal distance, enough to be able to support the entire unit. The brackets should be placed in the upper part of the motorhome, above the vehicle’s windows. Mark the holes in the brackets, as they are going to be the places where you need to drill holes in your motorhome to put bracket’s sustaining bolts. There will be two bolts for each bracket.
- Drill the holes for the bolts in the exact spot where you measured.
- Take the brackets and apply transparent silicone on its back. It will help fix the bracket on the metal body of the motorhome. Before using the silicone, make sure the two supporting bolts are already placed on the bracket.
- Place the bracket on the measured zone, making sure the screws will go into the holes you drilled earlier. Press gently to make sure the silicone will adhere to the entire surface of the bracket.
- Go inside the motorhome and secure the ends of the bolts from the brackets using washers and lock nuts. It will help fix the bracket better and provide a better support.
- Do the same with each of the other two brackets remained, until all of them are fixed to the surface of the motorhome.
- The awning installation will open due to an electric motor. Thus, it will need an extension of the cables that make the awning function. The length of the extension cable should be long enough to cover the area to the supply outlet inside the motorhome.
- You just need to make a connection between the awning lead and the extension lead. Secure the connection area with duct tape, for a better isolation of the wires.
- Next you will need to make a hole in the motorhome’s body, through where the electric leads will enter inside. The hole should be in the upper part, near the center bracket, or according to where the awning system has its wires positioned. To work, the awning installation will need a 12V power supply. So make sure you will have a free one inside your motorhome.
- The extension cable will be furthermore connected to a switch and a power supply.
- Take the awning frame and position it on top of the brackets. You will need an extra hand for this job as it takes two people to lift the awning system and place it right.
- Make sure it is positioned correctly and see that the power wires go alongside the awning, and into the hole you made especially for them.
- Now, give the awning system a try. Press the ON button from inside the motorhome and let the awning unfold about half way. Stop and take out the extension metal legs of the awning and position them on the ground for extra stability.
- After the metal pins have been fixed in the ground, turn ON the awning again and let it spread out over its entire length. In the end, you can place the metal legs of the awning in a way it is comfortable for you, creating plenty of shaded space.
.